I'm still working on listing everything, so if you've seen something I've made and would like to order it, message me and I will create a custom listing!
To find me, search for Reiderses; that's my shop name (Peaches McGee was taken)!
Happy shopping!!!
Saturday, January 19, 2013
Tuesday, January 15, 2013
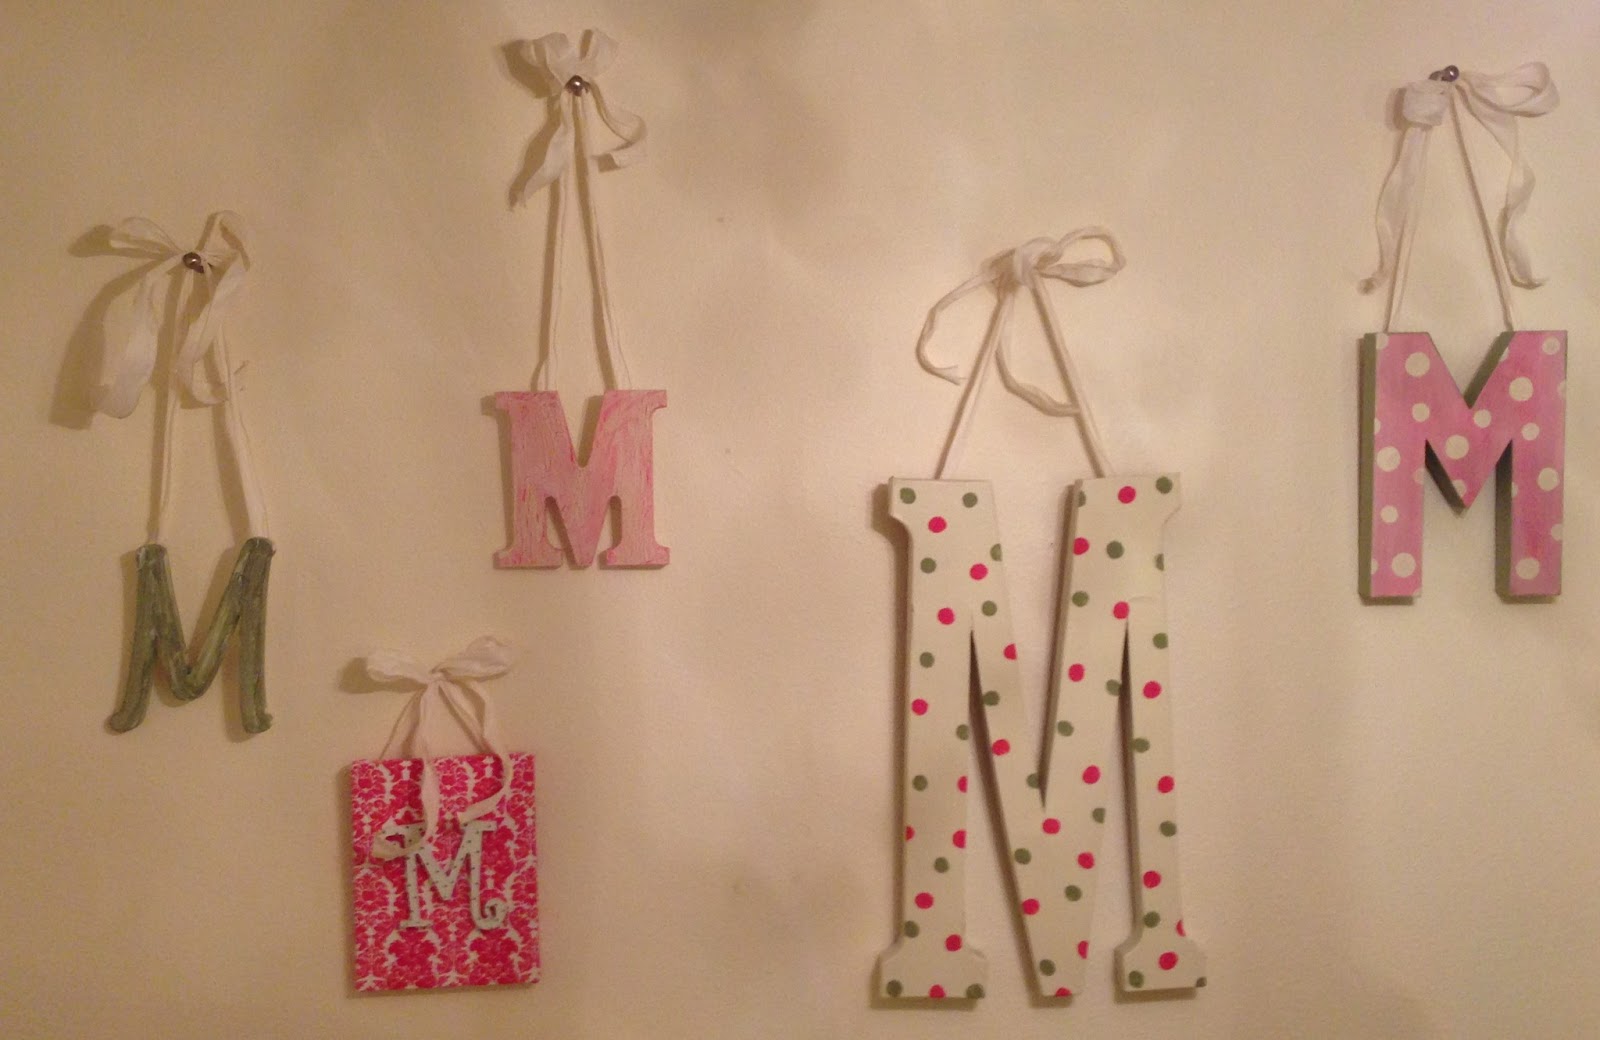
"M" I Missing Something?

I have an obsession and it's with the letter 'M' because that's the first letter of Peaches McGee's real name (Milla). I have a few that I've purchased, but haven't hung yet, so I decided to get at least one of them up. My first attempt was punching out paper flowers and gluing them on. It was ugly so I decided to try something else!
I had a canvas board that had been sitting in my craft room for a while. I decided to wrap it with fabric and then staple gun it nice and tightly around the canvas. I then painted green dots on the 'M' (after removing the glued flowers) and when it dried, I used regular craft glue and mounted it to the fabric-covered canvas. I liked it enough to hang in her room and she liked it enough to say, "Oooooh, Mommy! Thank you for my pretty decoration!"

 |
| UGLY |
 |
| Canvas |
 |
| Clearance craft paint (I love a deal!) |
 |
| Back of the canvas with the fabric stapled to it |
 |
| Front of the canvas |
 |
| Dots on my 'M' - I just used a pencil eraser dipped in paint to get the "perfect" dots |
 |
| Project (almost) complete! |
I wasn't 100% satisfied because I realized that all of the other 'M's were hanging, so I took two pieces of ribbon, stapled it to the back of the canvas and tied a bow. Much better!

Friday, December 7, 2012
Spotty Dotty Paper

Last year I made my own Chevron wrapping paper and I loved it. But my lungs did not... I inhaled more spray paint than any person should. Therefore, I decided to do something different.
I wanted to include Peaches McGee, but wasn't ready to give up complete control and let her have free reign on the paper. My solution: give her a pouncer paintbrush where she could put simple dots on the paper. It turned out so well and I can't wait to wrap all the presents in it.
Things you need:
- Contractors Paper (I bought mine at Lowe's last year - see this post)
- Red, White, and Green Acrylic Paint (or whichever colors you want)
- "Pouncer" Paintbrush (similar to these, but I bought mine at JoAnn's near the stenciling items)
I placed a squirt of each paint on a different paper plate (can't mix those colors), and then let Milla "pounce" away with her paintbrush. She didn't really understand spreading it out, so our dialogue kind of went like this:
Me, "No, honey. You need to spreeeeeaaaaadddd around the dots like this." Trying to do a good example and not become the controlling OCD mother that I am.
She places a million dots over one other.
Me, "Like this honey. No. Like this."
Peaches, "Like dis?" Putting multiple dots in the same one inch diameter again....
"Oh forget it; it'll be extra special now." *sigh*
 |
| Can you spot Peaches' spots? |
 |
| Finished product! |

Saturday, December 1, 2012
Clutch Shot
Life has been busy (but hasn't everyone's)? Well, when my life gets out of control,
I like to craft. Do I have time to do
it? Probably not. Should I do other things? Maybe.
But, it’s my form of therapy and Lord knows I need a lot!
I realized that I neglect my blog because I don’t have the time (or
rather, I don’t want to give the time) to writing instructions, etc. Then I realized that the reason I created the
blog was to journal my journey while experimenting with crafts. It was originally for Martha Stewart crafts,
but she bored me and I moved on to Pinterest.
Below is a kickoff to many more posts to come... I have almost ten projects that I plan to document!
But first... my proudest accomplishment... the clutch, the coin purse and the iPhone case (sorry, can't find this instructions for the iPhone case (besides, it wasn't all that cool)). If you like them, give them a shot. I'm going to make a bunch of the coin purses for Peaches' little girl friends for Christmas along with a little trinket inside them :)
 |
| Front of clutch |
 |
| Back of clutch |
 |
| Coin Purse |
 |
| iPhone case |
Tuesday, September 25, 2012
Under the banner of Milla's ceiling
 |
| The banner flags hanging from the ceiling along with the "Ms" that I've made |
Oh wait! It's still here - it's just fallen by the wayside while the author attempts to run a house, a non-profit foundation and keep her sanity. She's been successful at some, but not all of them.
Several projects have been made, but none have been blogged about because it's hard to sit in front of a computer when that's what you do at work all day (right?!).
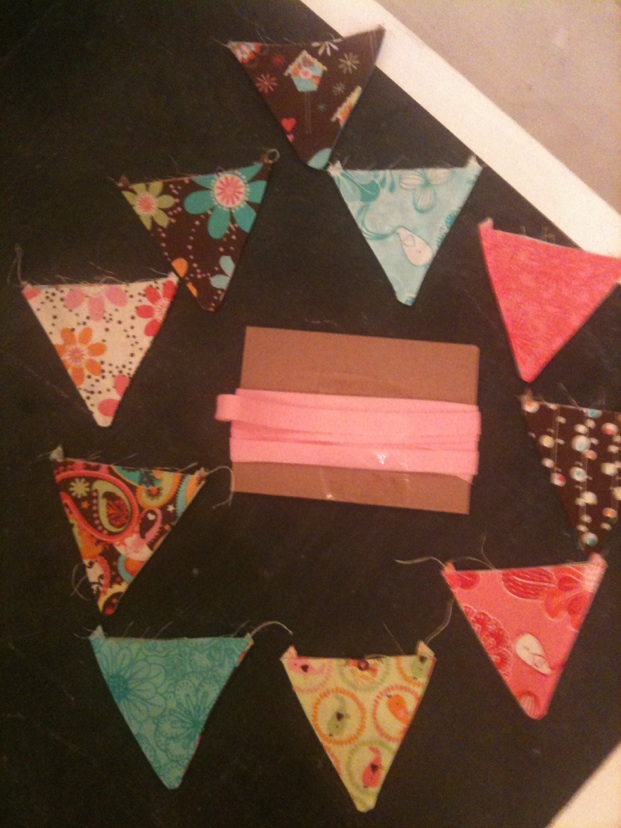
Well, here's one that I had to share because it was my own idea (yes, really) and it's so simple, I can't think of any reason not to do it; other than if you 1) don't have a sewing machine, 2) don't care about banner flags, 3) don't have time, 4) have no desire to.
As you know, I love banner flags and create personalized ones for my friend's kid's birthdays. I've made six so far and I'm pretty sure that I've promised another 100 or so to others (I'll get right on it, I promise).
While I love the banner flags, I despise cutting out the triangles! When I came across a package of pre-cut triangles ON CLEARANCE at JoAnn's, I knew I had to do something with them. While they weren't super cheap, they were reasonably priced and worth it.
 |
| $6.97 for 60 flags total (double-sided) |
Here's what I did:
- Sorted them out and placed two different patterned triangles right sides facing each other
- In hindsight, it's probably easier to use two of the same patterns - I just wanted that random, bohemian look
- Took the easy way out and didn't pin them together - I just straight-stitched down two sides with my machine (you'll need to keep one side open to turn it right-side out).
- Turned them right-side out and ironed them

- Sandwiched the two pieces between some bias tape that I purchased from pickyourplum.com (again, took the easy way out and didn't pin them - I just held them while I ran it through my machine)

iPhone picture, can you tell?
- Tried hanging it in no less than five places in Peaches' room before deciding that the ceiling was best

Notice the camera on the wall? How Big Brother of us :)
 |
| Nicely sorted |


I bought another set and can't wait to make more - it just might be another six to ten months!
Friday, June 15, 2012
Don't Be A Card!

My blog has been neglected… but I have to prioritize things
now that I’m a working mom. Needless to
say, I haven’t been able to craft like usual, but I haven’t gone completely
into hibernation!
For Mother’s Day, I decided to tackle the button-embellished
cards craft from “Martha Stewart’s Handmade Holiday Crafts.” It was another one of her crafts where she
has one picture and it’s not even of the completed project! It’s in progress, so I guess you just have to
imagine what the final product looks
like. Grrrrrrrr.
I have a ton of really cool buttons thanks to my husband’s
grandfather’s second wife (did you get that?), whose house we now live in. They’re all from the 50s and 60s and as it’s
been said before, things really were made better back then. The quality is incredible and the details are
so intricate (not to mention the vibrancy of the colors!).
I decided to make four cards… one for my mom (of course), my
mother-in-law, my sister, and my sister-in-law.
I didn’t quite anticipate the time it would take, so I may or may not
have been scrambling to finish them the night before Mother’s Day.
Here are the supplies that I used:
 |
| Clockwise from bottom left: green embroidery floss (for stem), micro-hole punch, double-sided tape, ribbon, pen for personalizing (not required), pencil for sketching out where to sew, decorative scissors (not required), white embroidery floss for attaching buttons |
Here are the steps (in my own words):
- Cut a piece of card stock in your choice of size and color (but please make sure that it will fit in an envelope if you choose to use one).
- Cut another piece of card stock in a contrasting color, smaller than the other one. I used decorative scissors for a fancier look.
- Place your buttons how you would like them to appear on the card. I used three for each card, but in Martha’s example she uses six (or possibly seven because it’s not a final project, so we just don’t know!). Use a pencil and then trace dots where the stitched stems will be. It’s also helpful to use a needle to poke holes along the lines – though to be perfectly honest, I didn't do it because I didn’t read this until putting together this blog entry.
- Using embroidery floss, attach the buttons to the card. Then use green floss, embroidery floss that is, and stitch the stems using a running stitch.
- I used a micro-punch to make two little holes for the ribbon to tie the “bouquet” together. Then I threaded a small amount of ribbon and tied a bow.
- Use double-stick tape (or glue if that’s what you have) and attach the embroidered card to the larger card.


Some other things that I made…
I found this cool item on Pinterest
(surprise, right?) and it’s a booster chair for the kiddos using a vinyl
tablecloth!
I purchased two vinyl
tablecloths last year thinking that I would make bibs out of them, but decided
against it, so I had two cloths to choose from.
I wanted to test out the pattern first and see if I liked it before
cutting into the second tablecloth, but now that I’m done, I think I’m going to
make another!
Here are the instructions, and here are my
results:

\


I also finally completed the 4th
of July Topiaries that I started on LAST YEAR.
It’s a tedious task… you cut off stars from a garland, then take
dressmaker pins and pin it around the topiary form. I love how it turned out, but good GOD did it
take a while. Of course it would have
been easier to do just one, but I have two for all of the major holidays, so I had
to do both…
 |
| Garland and some of the stars I cut off of it |
 |
| Dressmakers pins |
 |
| Close-up of topiary ball... yup, that's a whole lotta pins in there |


Tuesday, April 24, 2012
Someone Needs a Crane-iotomy… And For Once it’s Not Me!
With joy in my heart, I write this blog entry knowing that
it may be a while before I write another.
I was just named Executive Director of the CLP Foundation and I couldn’t
be happier. I worked really hard to
obtain my CLP (Certified Lease Professional) several years ago, and now I get
to return to an industry that I love and an incredible group of colleagues that
I missed.
On to the project.
I buy a book… a big, expensive book. It’s called, “Martha Stewart’s Encyclopedia
of Craft:s An A-to-Z Guide with Detailed Instructions and Endless Inspiration.” She has the audacity to include a paper craft
on cranes?! Origami cranes?!
A little background.
In third grade when I was in Mr. Higa’s class (RIP Mr. Higa), we made
origami cranes. Whoever made the best
one got to go around to the other classes and teach them how to do it (we were
attempting to make one thousand cranes at T.T. Minor). Being the perfectionist that I am, I wound up
winning and got to teach everyone how to do it.
Wow. That really sounds like I’m
bragging, doesn’t it? I guess I am.
But that was third grade.
This is big girl’s life and why in God’s name is there a craft for
making origami cranes? Am I mistaken, or
does the title include, “Endless Inspiration.”
Really? I buy an expensive book
to learn to make origami cranes?
Alas… my response was to make it with pirate cardstock. I’m such a rebel badass.


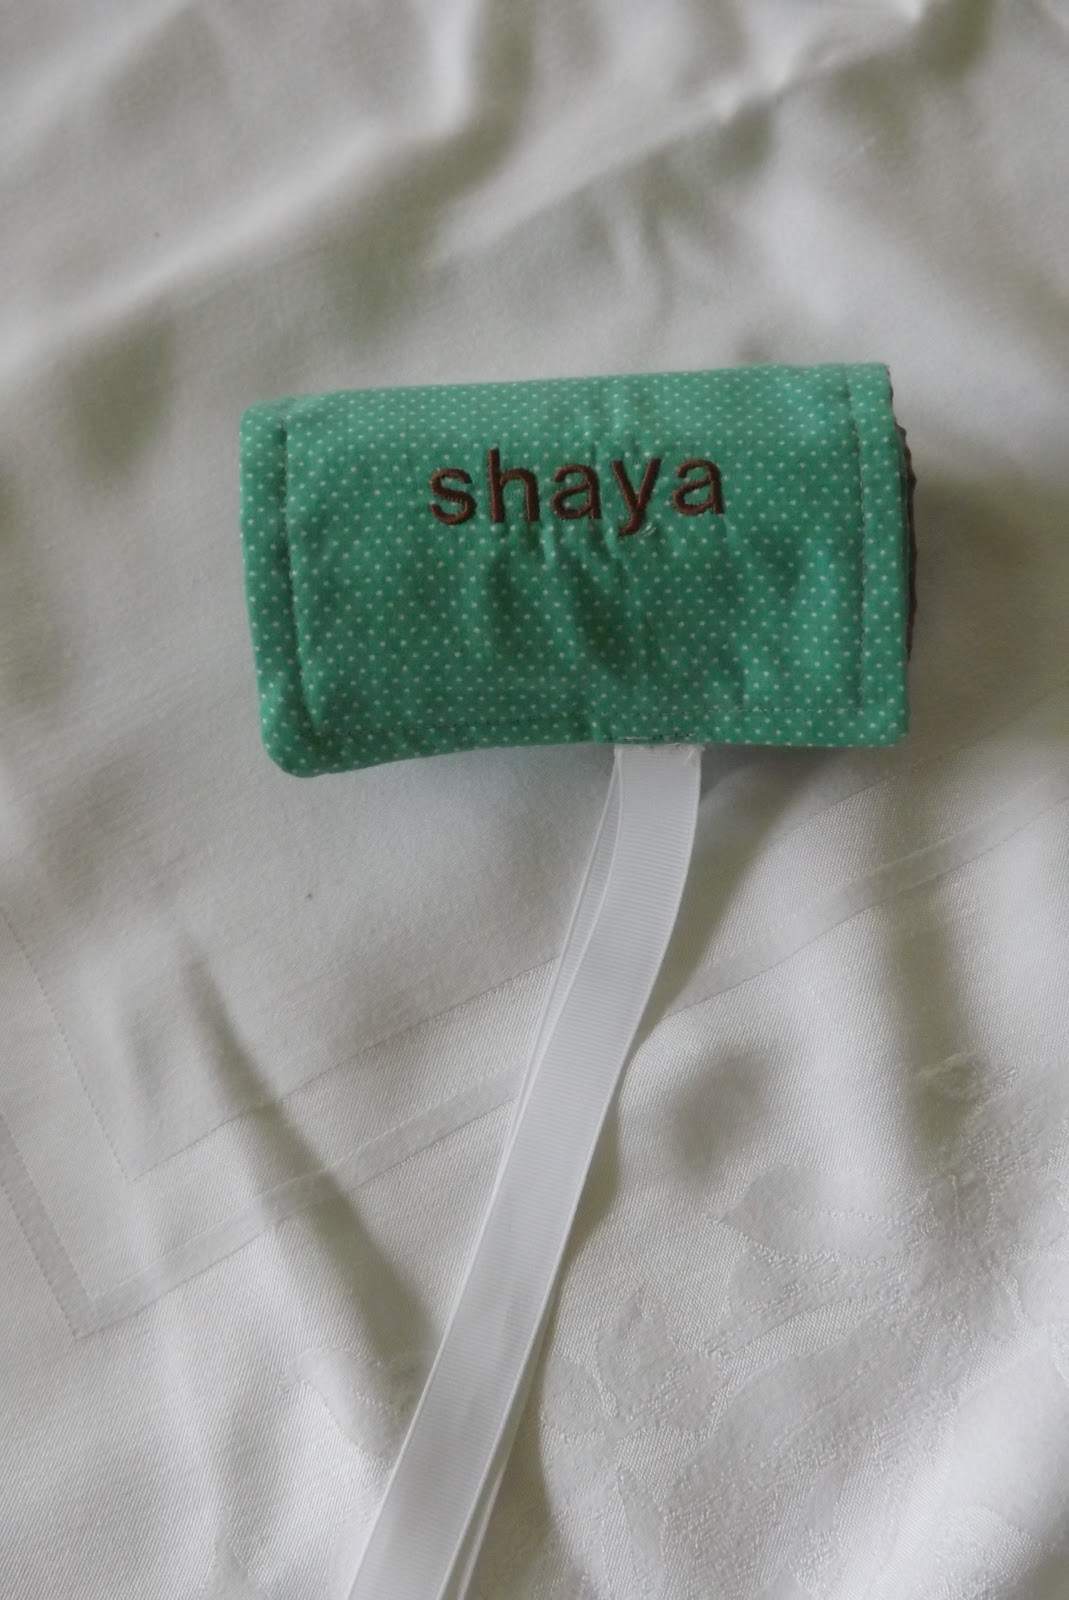
However, I had more projects to keep me busy. First, the crayon roll.
It’s not exciting; nor is it sexy (that’s the word that everyone uses now for everything,
including food). But it is useful and I
think it’s pretty cute. I used this tutorial
but before sewing the pieces together, I embroidered “Shaya” on it (the name of
the adorable little girl that I made it for).


I also made some monogrammed napkins for my friend Shelby
who just purchased a beautiful new house with her husband. I love the colors of khaki and black
together, so when I found the khaki napkins, I had to use black for the
embroidery. She kept her name and while
I was tempted to use their ‘made-up’ joint name (Montsworth), I refrained and
used the first initial of each of their last names.

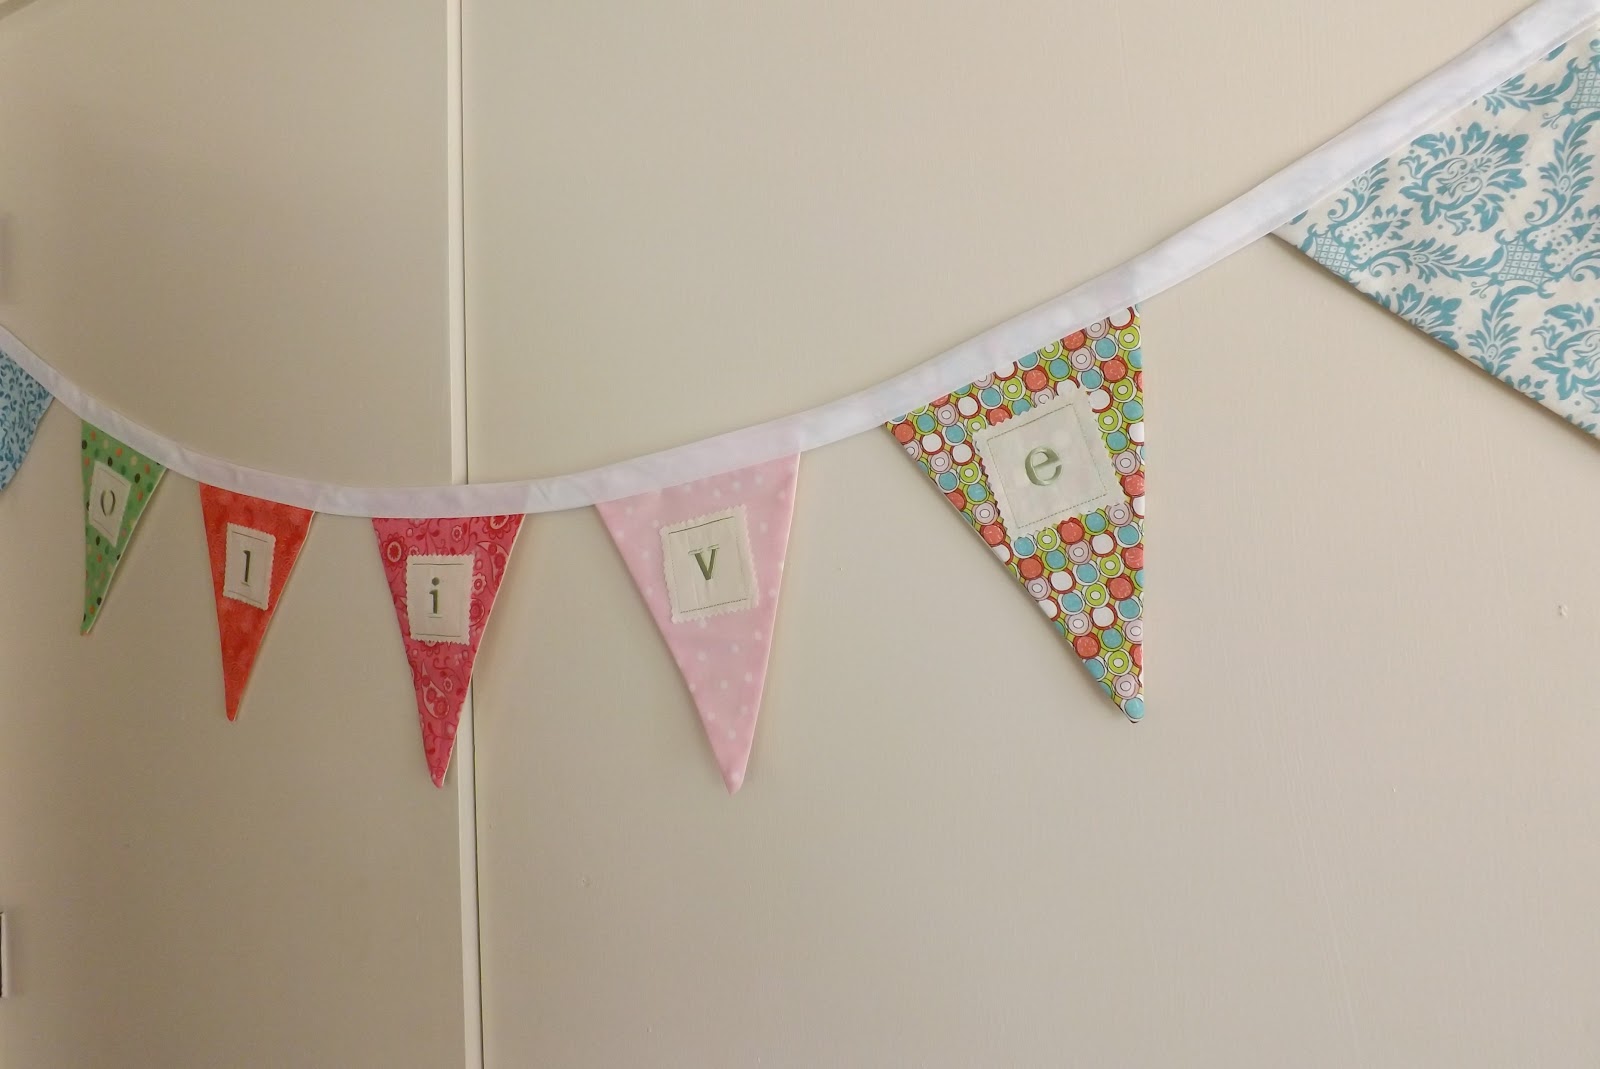
Lastly, I made two more flag pennant banners for two of the
cutest little girls, Olive and Kenley.
Their mom consulted with me beforehand and didn’t want a contrived look,
so I used a different piece of fabric for each flag and different colored
embroidery for the girls. I love the
look!


