Decoupage Dresser – Take 352
Financial Investment: $$$ ($25+)
Emotional Investment: L Call the doctor; I need to up the anti-depressants
Worth the Investment: - Not so much
Here is the link to
Martha’s project from her website. The
first comment by another reader perfectly sums up how I feel about almost every
project I’ve done of hers so far, “I attempted to make this, but I failed.”
Urgh. How long have I
been working on this project? Well, it’s
the second project I tackled when embarking upon this journey and here I am,
almost eight months later? Has it been that
long? I’m not really sure, but it
certainly seems like it has been.
Rewind to when I first began and I put about 22 coats of
paint on a dresser only to realize that it wouldn’t work because it had rounded
corners. For once, Martha’s directions
were clear and it was my fault that I didn’t follow them. Damn her.
For months, I trolled Craigslist for months to find the
perfect dresser; I looked on street corners when driving through neighborhoods all
in hopes of finding a dresser that could be used for this project. It needed great bones, and more importantly,
it needed to be CHEAP (or free).
I finally found one… $10 and it wasn’t far from my
sister-in-law’s house, so I went for it and put my faith in Mr. Craigslist’s
hands.
Here it is:

When I went to pick it up, I had no idea that I would also
be picking up an odor. An odor that was
so pervasive, my car smelled like it for at least a week. Did they live above a stinky restaurant? I don’t know, but the stank was
permeable. It was so strong that I
decided to put the prep work on hold until I could handle being in the same
room with it. (Or at least that’s the
story I’m sticking to, rather than admit the fact that I was a little lazy and
didn’t want to start the project). The
prep work included scrubbing it with a degreaser, sanding off icky spots, and
filling the drawer-pull knob holes with wood putty.
I painted it a light green color to go with my craft room décor
and reminisced about my experience dealing with the Fred Meyer paint man. Never argue with someone who doesn’t know
what they’re talking about (and no, I’m not referring to myself).
After the coat of paint, I made a template of the drawer by
tracing the perimeter of it on Kraft paper (FYI, if you ask someone at JoAnn’s
what Kraft paper is, they won’t know.
Seriously. I finally put two and
two together and figured out that it’s basically just postal wrap paper. You know, the brown bag stuff. Oh, and p.s. you can get it at the dollar
store!).

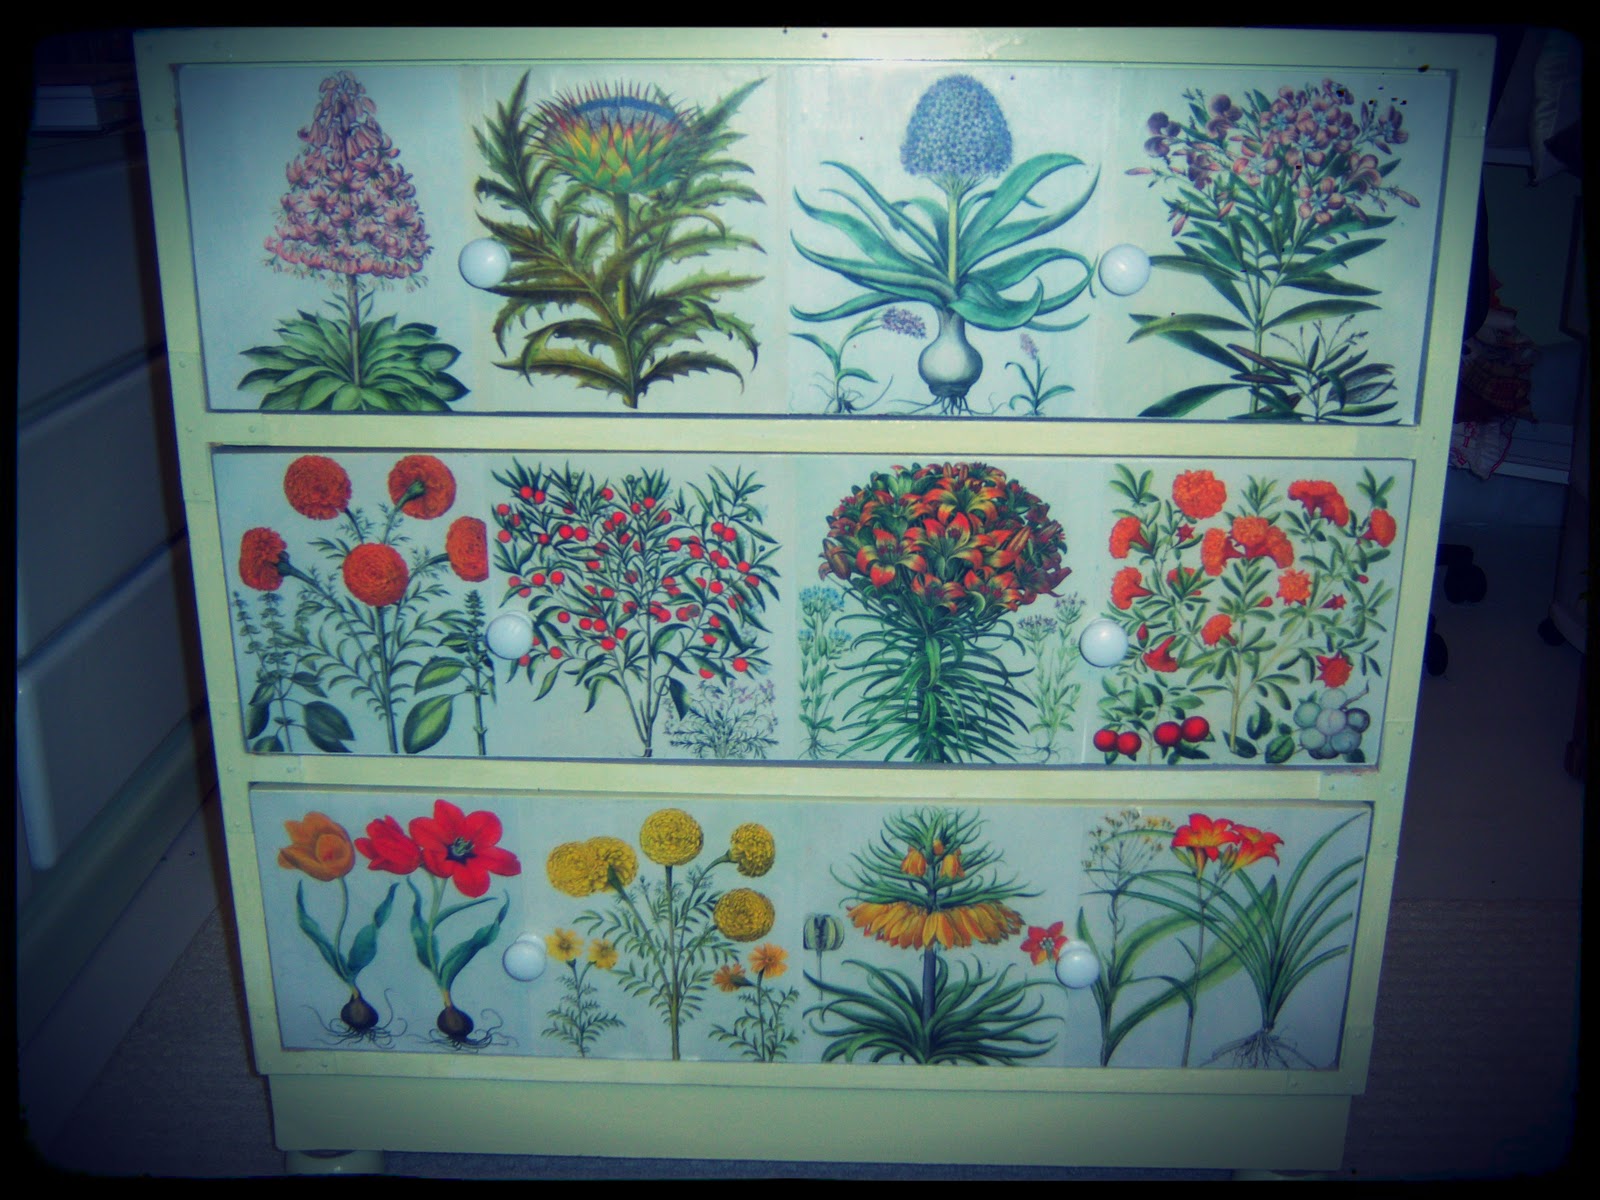
One of my first steps when beginning this project was to buy
some botanical prints. I went on
Amazon.com and searched for botanical prints and came across this book.

I also decided to add some feet to the dresser since it
seemed really boring, so I purchased some metal plates and ball feet at Lowe’s. I painted them to match the dresser and
attached them to the bottom. I also
decided to change out the hardware on the drawers as the silver pulls that came
with it detracted from the project and didn’t really go with the whole ‘garden-chic’
vibe I found some knobs that I had purchased at IKEA a long time ago, and just
spray-painted them white.


When cutting the botanical prints, I tried a paper-cutter
and a rotary cutter only to discover that the Xacto knife was the way to go… No
slippage and no tearing.
I was determined to follow Martha’s instructions, so I
heeded her advice and taped each print to the Kraft paper with masking tape and
painted it with paper sealant (fancy name for Modge Podge). What a joke!
Not only did the masking tape leave some tears on my prints, but it was completely
noticeable where it the tape was because the sealant leaves a texture and
slight color. She claims that the
sealant strengthens the prints… um, not really.

I chose to group mine by color. Using my exceptional math skills, I
determined that each drawer would take four prints, so I grouped them in hues
of red, yellow, and purple. I then very carefully placed the first print on the
drawer after slathering it with Modge Podge.
Only to realize that I had it UPSIDE-DOWN!
Yep, that was brilliant.
It didn’t come off easily and left me one print down, so that I had to
go through the book again and re-trim another print.
I finally got the hang of it, and followed her directions of
placing one on each end of the drawer, and then moving towards the center so
that they could overlap, if necessary. I
also used a brayer (ooooh, look at me and my fancy craft tools), to smooth them out, but somehow managed
to still have bubbles. The perfectionist
in me was ready to toss some lighter fluid and a match at the dresser, but I kept calm and decoupaged on.
So, here it is.
 |
| Better view of feet and knobs |

Is it my favorite?
God, no. But, I did it and I can
honestly write on marthastewart.com for this project that, “I tried it and didn’t
fail.”