Pages

Saturday, February 26, 2011

Decoupage Dresser Disaster

Remember in my first paragraph of the Decoupage Dresser post, where I stated, “It was one of those from the 80s that has rounded drawer corners and a generic oak stain.”?  Oops.  There is a word in there that Martha Stewart (or her minion) states that the dresser should NOT be/have.  ROUNDED drawers. 
 
Feck.

I didn’t swear.  Look closely, that is an ‘E’, not a ‘U’.  Sheesh.

Back to square one on that project… I mean, I tried to make it work (I put three coats of paint on it for God’s sake), but there is no way that I can decoupage the botanical prints to the drawers and have it look even halfway decent (or have it stick).  Oy.  Guess I’ll have to make a Peaches McGee original example out of it.

Now I have to find a dresser that has no molding or rounded edges, etc. 

Does any one of my thousands of readers have one to donate?

I crack myself up.

I’ll keep you posted…  Craigslist here I come.

Tuesday, February 22, 2011

Decoupage Dresser – 18 Day Project, Whale Step Stool, and a Peaches McGee Original!

Okay, so I’m not really sure if the dresser is going to take eighteen days, but at this point, that’s what it feels like.
 
My dad gave me a HEINOUS (I like that word, so I’ll be using it a lot) dresser that he had purchased many years ago.  It is one of those from the 80s that has rounded drawer corners, no pulls, and a generic oak stain.  Why am I telling you this instead of showing you a picture?  Because I committed the biggest faux pas of them all…
I forgot to take a friggin’ ‘before’ picture.  Grrrrrrrrr.
Here’s a picture of it after I got a coat of primer on it.  Yes, there are drawers, but why would I take a picture of those?  Hissssssss.

I was really excited because I found this expensive primer from Valspar which states on the label that it is for drastic color changes.  Perfect!  That means only one coat and then I’ll just have to put a coat of paint on it.
Not so much.
So, at this point, I’ve got one coat of primer on it, and one coat of paint, and one to go.  Then (per the instructions, which I will be following this time), I have to wait a week for it to “cure.”  Didn’t realize that it had a disease, but I guess it could. Maybe that’s why it was so heinous?  I'll keep you posted on this project.
Of course I wasn’t content with doing just one project, so I also decided to tackle the Whale Step Stool, which is essentially the same project, but on a smaller level. 
I took this step stool that my husband so kindly used to prop up his batman belt that he spray-painted for one of his shows.  Yep, that hubby of mine is the front man for Schudge.  Word-class rock star if you ask me (trust me, there’s nothing like seeing the man you love on stage, even in a homemade Batman costume).
Here’s the before picture (luckily I remembered to take one)

And same drill as the dresser… one coat of primer, one coat of paint, and one to go.
I’ll continue to post my progress (assuming I make any since I’m about ready to throw both in the trash).
Oh, right, I also decided to do another project last night… Valentine Topiaries. 
It’s not Valentine’s Day, you say.  Well, I don’t care because I have had about a dozen topiaries gathering dust in my craft room since I purchased them for my wedding three and a half years ago, and never used them.  Plus, if you buy Valentine’s Day decorations AFTER the actual day, you get 70% off.  I’m a sucker for a great deal.
Here’s what I did (and imagine that I did it twice, which I had intended on doing, but was mesmerized by the Real Housewives of Atlanta reunion, so I didn’t work too quickly).
The supplies (topiary, plant pot, Valentine’s wreath, embroidery scissors (I just purchased them to appear more "crafty," and pins).  Why are they not in one picture?  Who knows.  One glass of wine too many perhaps.


I then cut off each large and medium heart from the wreath using the embroidery scissors (loads of fun), and attached them to the Styrofoam topiary with a pin (lots easier than burning the crap off your fingers with the hot glue gun).  I then wrapped ribbon around the stick and attached it with CRAFT GLUE (see above note on the hot glue gun), and finished it off by tying a ribbon in a bow.  Lastly, I put it in the pot with some reindeer moss (who knew that reindeer preferred one moss over another?  I didn’t).  And that’s that.  Not too shabby.


Big ball with large hearts (Ha!  I said big ball).


Smaller ball with medium hearts


Reindeer moss on the bottom

Thursday, February 17, 2011

Brag Book – Take 2 (Including an Apology)

Anyone who knows me well (or has played any game with me), knows that I am super competitive and HATE to lose.  So, let me take you back in time to when I was a fourth grader in Mrs. Goodrich’s class at Villa Academy.  She had a project for us to complete and whoever finished fastest, won.  I prided myself on always being the first to finish tests, math tables, etc. and I was REALLY UPSET when I saw others finishing before me.  I was panicky and angry at myself that I couldn’t get it done and then I got to the last question.  I don’t remember what it was, but basically the purpose of the whole exercise was to read the directions completely before attempting to perform the task/project.
I didn’t do that with the Family Brag Book.
I looked at the pictures and thought, “I can figure this out, no problem.” 
Problem.
I’d like to apologize to Martha Stewart, God, and everyone else whose name I took in vain.  It really was an easy project.  So easy that I did it last night in less than 30 minutes.  However, I also outsmarted Martha (or her minion who put together the project), and here’s what I did.
I went to Joann’s to get the plastic binder sheets that she suggests (when you read the actual “How-To” and not the “Project Supplies” section, she specifies that you need binder sheets made to hold sports cards, or side-by-side pockets from 1 double sided pocket or binder sheet).  Clear as mud.
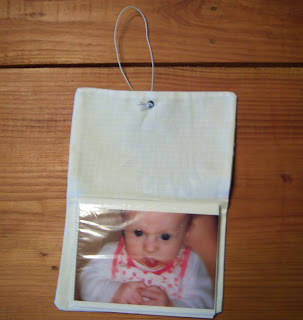
I had Milla in the Bjorn and was getting a little frustrated and tired (she’s getting big!) and it dawned on me… Why do the hard work when I could just purchase a cheap little photo album (see below) and cut out the little sections with the photo pages in it?!  It cost me way less than the photo sheets that I never found (okay, I’m just assuming, but I’m pretty sure).
Using an X-Acto knife, I cut out the section
Look how pretty it is, and I didn’t have to do a thing!  No sewing plastic!!!
Then I took two pieces of fabric (which I had purchased to make my friend Yvonne an iPad cover and failed miserably at), and sewed them together, right sides facing each other.  Of course I sewed around the entire thing forgetting that I had to pull them right side out, but that was easily rectified by my favorite thing ever, THE SEAM RIPPER.  Next I just slip-stitched (talk dirty to me) the hole closed, sewed a seam down the middle, and voila!

Fabric

Back of book


Open book

Front of book
I added an eyelet on the front and back (FYI, you don’t need one on the back, but for good measure I did it anyway (oops, read the directions REID!)). 
Then tied a piece of elastic around it, and here it is...

FINISHED!

I had to include a picture of Milla at her prettiest… I’m thinking that she knew all along that I was doing it incorrectly and this is how she felt.

Wednesday, February 16, 2011

Family Brag Book - Take One


Financial Investment:   $$ ($6 - $20)
Psychological Investment:    L  (call the mental hospital, I'm on my way)
Worth the Investment?:   -  (don't bother)

Good God.  I believe that I actually said that Martha Stewart should be shot.  This craft was not easy at all.  Has anyone out there ever tried to frickin’ sew plastic?  Are you kidding me?  And the directions… WTH?

Luckily, I was at my Aunt Penny’s house who is a master crafter extraordinaire because if I wouldn't have been, I may have given up completely.  She was gracious enough to watch Little Milla while I tried to complete the project (I've included some pictures of them since Milla loves her so much), and it still took me more than FIVE HOURS to produce a product that I’m less than thrilled with.
I was so traumatized by the experience that when Miss. Milla woke up at 3 AM the night after for a feeding, I couldn’t go back to sleep because I was trying to figure out better ways of doing it. 
On to my experience…
The directions mention using wool felt, or a heavy fabric, so I chose to use some nice place mats that I bought from Big Lots several years ago that wound up costing less than a dollar a piece. 
I cut it down to size, hemmed it and then used pinking shears to trim it so that it looked like Martha Stewart’s…

Aunt Penny taking GOOD care of my baby while I tore my hair out

Then I used heavyweight plastic sheets…

First I had to cut them and realized that you need a SUPER sharp rotary cutter and a heavy hand to stabilize the plastic.  If you don’t, you wind up swearing profusely and throwing things.  Below is what I used (courtesy of Aunt Penny)
I also quickly learned that you CANNOT sew them (at least in a straight line or anything that a perfectionist could live with).  Just one example is shown below (and I have many more if you’d like to see them):


All of the drama was too taxing on Milla, so she fell asleep in Aunt Penny's arms :)

  
Then I tried double wide bias tape, which worked, but WAS NOT easy, still slipped and I think it looks hideous.
Oh, and the directions on how to attach the plastic sheeting to the book?  @#$%$#.  
Fast forward to attaching eyelets (not hard to do), and then using ribbon and attaching some tassels that I made several years ago, and this is what it looks like:


Front

Open (see the hideous bias tape job?)


Back


Five hours and I detest the end product...

Sunday, February 13, 2011

A project begins...

I've been a frustrated crafter for as long as I can remember.  I have my own craft room that I unfortunately neglect since I wind up researching new crafts and crafty blogs all night long.  I've even got a company set up to do it (ReiDesign, LLC).


I loved the idea behind Julie & Julia, so I decided to put a craft spin on it; and who better to do it with than Martha Stewart?  I mean, we are so similar!  We're women, we both started in the finance industry (okay, so I was just an intern and was never accused of insider trading, but still), and... you get the picture.

Join me as I attempt to re-create every project listed in her book, "Martha Stewart's Encyclopedia: An A-to-Z Guide with Detailed Instructions and Endless Inspiration."  I guarantee many frustrations and colorful language pictorials of my crafts.